Thursday, September 24, 2015

Profiles in PC Poisoning, Part 7

Recuva is the first entry in Tim Fisher's "19 Free Data Recovery Software Tools" survey. The second entry is a program called Puran File Recovery, for which Tim points out:
One particular thing to note - Puran File Recovery identified more files on my test machine than most other tools so be sure to give this one a shot in addition to Recuva if it didn't find what you were looking for.
I was p-r-e-t-t-y c-l-o-s-e to throwing in the towel with respect to recovering the CTB-Locker-encrypted My Documents\ .wps files on my father's computer but decided as a last-ditch effort of sorts to see if Puran File Recovery could help me out. So I go to this download page and download the PuranFileRecoverySetup.exe installer executable and then run the installer to install Puran File Recovery.

Help

When launched, Puran File Recovery first displays a Select a Language window.


As the window menu's English default option is what I want, I click the button. Puran File Recovery next displays two windows:
(1) a raised Things you should know... window


provides a summary of the program's capabilities and
(2) an underlying Puran File Recovery - For Home Users only window
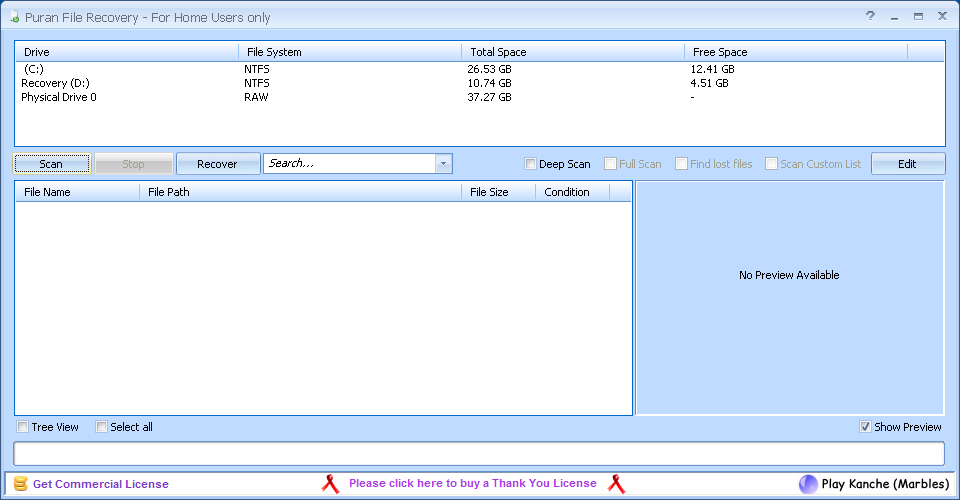


serves as a work area.

The latter window's title bar features a button (to the left of the Minimize button) that when clicked launches a help wizard with relevant screenshots for the program.
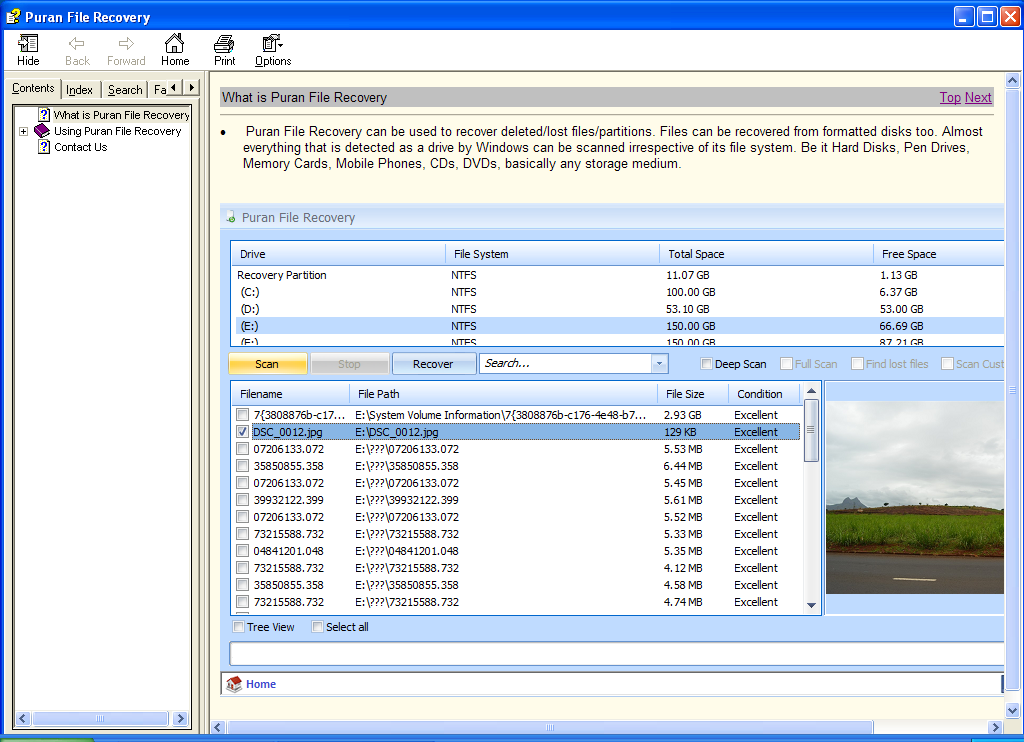


The wizard may be viewed separately at C:\Program Files\Puran File Recovery\Help\File_Recovery.chm: its material is not on the Web as far as I am aware.

Quick

Upon scrolling to its bottom the Things you should know... window recommends:
In all you should try Quick Scan first, if deleted file is not found, you should go with Deep Scan + Find Lost Files + Scan Custom List and if still not found, go for Full Scan as well.
So let's start with a quick scan, which simply scans the file system. Accordingly, I select the Recovery (D:) drive and click the button in the work area window. My quick scan takes about 10 seconds and returns 6,222 files. To the right of the button is a Search... text input-menu in which I can type *.wps so as to (after hitting the Enter key) filter the results for .wps files: nothing comes up when I do so.

Deep 1

According to the Using Puran File Recovery → Scan page of the help wizard:
Deep Scan    When you are not able to recover your files with Quick Scan, you should try Deep Scan. This option performs a Quick Scan plus scans entire free space of the selected drive byte by byte and tries to find following format files -

JPG BMP PNG GIF MP3 WAV OGG WMA WMV DOC XLS PPT DOCX XLSX PPTX PDF ZIP RAR MP4 AVI CAB RTF NEF CR2 DNG PST OST MPG ODT ODS ODP ODB ODG ODF
Hmmm, I don't see WPS up there, do you? But let's try a deep scan anyway. I reselect the Recovery (D:) drive, clear the Search... field, and check the Deep Scan checkbox in the work area window. Checking the Deep Scan checkbox
(a) enables but does not check the Full Scan checkbox,
(b) enables and checks the Find lost files checkbox, and
(c) enables and checks the Scan Custom List checkbox.



As regards the Find lost files action, the Using Puran File Recovery → Scan page says:
In addition, if Find Lost Files Option is selected, Deep Scan also detects the file records that were lost. This ensures that where ever possible you get the file name and in many cases file path too. Also, since files are listed as per the information in the record, recovery is mostly more accurate.
This certainly seems like something we want, doesn't it? As regards the Scan Custom List action, I'll have lots more to say about it in the next section. I go ahead and click the button. My deep scan takes about 20 minutes and returns 8,097 files. A *.wps filter again returns nothing. However, there's no need to run to a full scan just yet...

Customize it

Puran File Recovery has an all-important feature that Recuva does not have: it enables the user to extend the range of the file types it searches for.

As noted above, a deep scan searches for a core set of file types; if the Scan Custom List checkbox is checked, then the core set is augmented with a second, custom set of file types that are detailed in an Edit Custom Scan List window
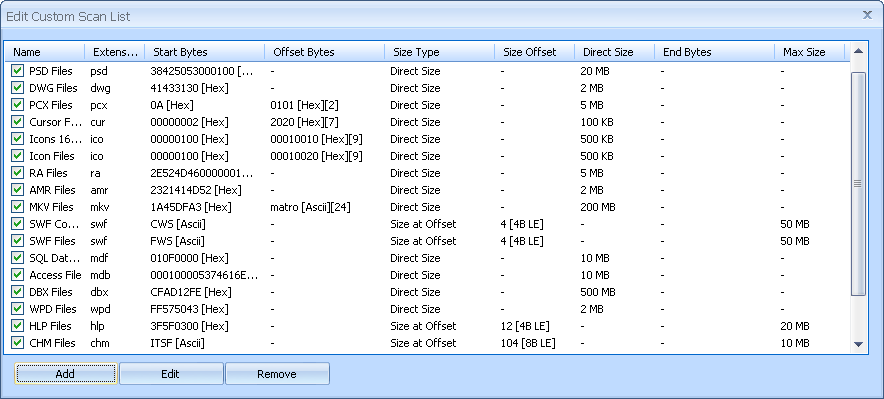


that is displayed when the work area window's button is clicked. You may add more file types to the custom set if you so choose.

As you would intuit from the preceding screenshot, a deep/full scan searches for file types via profiles maintained by the program for those file types: at a minimum each profile contains a file signature (a.k.a. a file magic number) and the position of the signature in the file byte stream; a profile may also contain an indication of file size and/or a characteristic end-byte pattern.

We can search for .wps files by adding a corresponding .wps profile to the custom set database. Toward this end, I first click the button in the Edit Custom Scan List window. Up pops an Add Custom Scan Entry window.


• I find the .wps magic number and its position in the byte stream at this page. The .wps magic number is an 8-byte D0 CF 11 E0 A1 B1 1A E1 hexadecimal pattern and its "offset" is 0 bytes, i.e., it appears at the very beginning of the byte stream. I accordingly type D0CF11E0A1B11AE1 in the Start Bytes field - per the help wizard's Using Puran File Recovery → Custom Scan List page, there should not be any space between the Start Bytes characters; meanwhile, the Start Bytes Hex radio button is checked by default - and set the Offset Bytes field to None.

• The Size Type field is a selection list comprising Direct Size, Size at Offset, and Look for End Bytes options; I leave it at the Direct Size default as the other two options do not apply to .wps files to the best of my knowledge.

• Having selected a Direct Size Size Type, I set the Direct Size field to 10000 KB as the largest pre-CTB-Locker My Documents\ .wps file was a 9,570 KB Dogs Apr 06.wps file. (I'll have more to say about the Direct Size setting after we run our search.)

• The Extension is of course wps; for the Name I use the MSWorks text document Description on the aforecited .wps magic number page.

After clicking the button we are ready to roll.



Not quite so magic

According to the Using Puran File Recovery → Scan page, a deep/full scan can find .doc files and .xls files and .ppt files (vide supra); however, these file types have the same start-of-stream D0 CF 11 E0 A1 B1 1A E1 signature that .wps files have. Evidently one or more other criteria come into play when distinguishing .doc/.xls/.ppt files - my guess is that they contain other characteristic byte patterns via which they can be told apart - in any case we are going ahead with the above .wps profile and we'll rerun the deep search therewith at the beginning of the following entry.

Thursday, September 10, 2015

Profiles in PC Poisoning, Part 6

Having introduced the Recuva file recovery program in the previous post, it's time to get down to brass tacks and see what we can rescue therewith.

On the Recuva Documentation's "Recuva FAQ (Frequently Asked Questions)" page, a • Fragmentation bullet point notes:
If a file is fragmented, you can recover it from an NTFS-formatted drive, but it may be less likely to be recovered.
I accordingly begin by re-defragmenting the D:\ volume. FYI, I am now able to launch the Disk Defragmenter utility via the Start menu:
Start → Programs → Accessories → System Tools → Disk Defragmenter.

Regular

Subsequently, a regular scan of the D:\ volume finds 6,221 potentially recoverable files. In the advanced mode,
(a) a *.wps filter returns 0 files,
(b) a *.jpg filter returns 20 files, and
(c) a *.pdf filter returns 0 files.

All of the *.jpg hits are preceded by a ● circle indicating that their recovery is unlikely.


See the Recuva Documentation's "Undelete and the Recycle Bin in Windows" page for a brief explanation of the Dd#.jpg name format.

Horizontally scrolling the results field brings into view a State column that pronounces the Filename files "Unrecoverable" and a Comment column that provides a
This file is overwritten with "D:\pathname\filename.ext"
message for each file.


According to the Path column, the Filename files are located in the D:\RECYCLER\ directory, more specifically a D:\RECYCLER\5-1-5-21-527237240-299502267-725345543-1003\ directory. A RECYCLER\ directory is normally hidden but can be visibilized by checking the

Show hidden files and folders

radio button AND unchecking the

Hide protected operating system files (Recommended)

checkbox in the Advanced settings: menu on the View tab of the My Computer → Tools → Folder Options window.


A visit to the D:\RECYCLER\5...1003\ directory confirms that the Dd#.jpg files are well and truly gone - your guess is as good as mine as to why they turn up in the first place. I nonetheless try to recover a couple of them:

(1) I check the test files' checkboxes on the left-hand side of the results window; checking the checkboxes enables the currently disabled button in the window's southeast corner.

(2-3) I click the button: up pops a Browse For Folder window (see below for a screenshot), via which I place the files in the C:\ volume.

Double-clicking the recovered files' icons does launch the Windows Picture and Fax Viewer but all I see therein is a
No preview available
message vis-à-vis a rendered image.

Deep

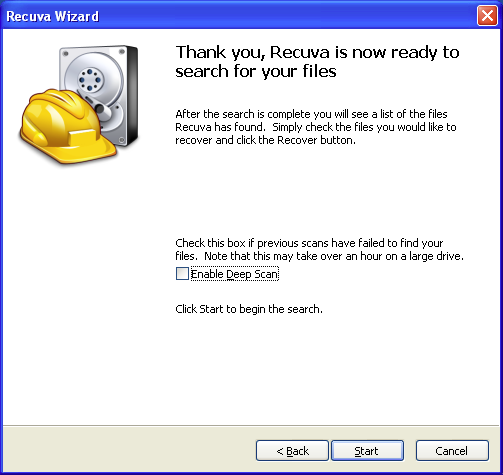
The wizard-mode Thank you, Recuva is now ready to search for your files window tells us that we should run a "deep scan" if previous scans have failed to find your files. For a deep scan, Recuva look[s] through your drive bit by bit, more specifically, it searches every cluster (block) of the drive to find file headers indicating the start of a file. Let's get a deep scan under way, then, shall we? We can enable a deep scan (toggle from a regular scan to a deep scan) by either
(a) checking the

Enable Deep Scan

checkbox in the wizard-mode Thank you... window or
(b) checking the

Deep Scan (increases scan time)

checkbox on the Actions tab of the advanced-mode Options window.


A deep scan of the D:\ volume (which takes ≈ 20 minutes vis-à-vis ≈ 12 seconds for a regular scan) finds 7,516 potentially recoverable files. In the advanced mode,
(a) a *.wps filter returns 0 files,
(b) a *.jpg filter returns 425 files, and
(c) a *.pdf filter returns 21 files.

The Recuva Documentation's "Deep Scan option" page specifies those file (extension) types that can be identified by a deep scan and .wps isn't one of them, so it's not such a surprise that our search didn't return any .wps files.

Regarding the *.jpg hits, the Dd#.jpg files are still there but now we also have 405 files that are linked to a ?\ directory and whose prospect of recovery is excellent: they're preceded by a ● circle, the State column pronounces them "Excellent", and their Comment column messages read No overwritten clusters detected. For almost all of the ● files, clicking a file name displays an image preview on the Preview tab on the right-hand side of the results window.


The ● files have a [#].jpg name format because, per the aforecited "Deep Scan option" page, a deep scan can only recover files, not [original] file names.

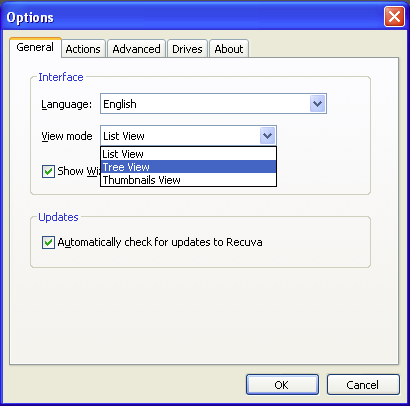
It gets better: I am able to pick out 64 ● files that contain photos belonging to my father's pre-CTB-Locker collection of My Documents\ .jpg photos. (The Options → View mode → Thumbnails View is helpful in this regard.) I check the files' checkboxes and click the button. In the Browse For Folder window I go to the C:\ volume and then click the button, which creates a New Folder\ directory, which I rename Recuva rescued images\.


I click the button and then go to
My Computer → Local Disk (C:) → Recuva rescued images
to see how it all came out: quite gratifyingly, the recovered files are good to go.

So, 64 out of 100 - not quite Meat Loaf's standard but I'll take it. Mitigating circumstances regarding the missing files:
• I don't know what state those files were in to begin with.
• Their .jpg extension notwithstanding, I don't know if they really were .jpg images versus some other image format (e.g., .bmp, .gif) or, for that matter, if they really were 'pure' images versus documents that commingled images and text.
• Some of the original photos were duplicates.
• Finally, I can't rule out that I didn't pick out all of the relevant Recuva results.

As for the *.pdf hits, their prospect of recovery is excellent as well; they don't give previews so I recover the entire lot as described above (I put them in a Recuva rescued documents\ directory). They're OK too, and all of them belong to my father's pre-CTB-Locker set of My Documents\ .pdf files.

I am able to recover some of the original .wps files via a different file recovery program and I'll tell you all about it in the following entry.

Sunday, August 30, 2015

Profiles in PC Poisoning, Part 5

If you are new to file recovery (as I was), I encourage you to go through the set of brief articles thereon written by PCSupport.About.com's Tim Fisher, specifically
(1) "How To Recover Deleted Files",
(2) "Will a Data Recovery Program Undelete Anything Ever Deleted?",
(3) "How Long is Too Long Before a File is Unrecoverable?", and
(4) "Why Are Some Deleted Files Not 100% Recoverable?".
Once you've read these guys, check out Tim's "19 Free Data Recovery Software Tools" survey.

Interestingly, CTB-Locker does not encrypt the original target files but rather copies thereof.
It’s important to know that CTB Locker creates copies of your files and encrypts them. In the meanwhile, the original files get deleted. There are applications out there that can restore the removed data. ... The newest version of the ransomware under consideration tends to apply secure deletion with several overwrites, but in any case this method is worth a try.
- "CTB Locker removal: how to decrypt files encrypted by CTB Locker virus"
Consequently, a number of the ctb-locker decrypt search pages suggest that a file recovery tool may be able to recover the original target files. The "Some ideas to restore files encrypted by CTB Locker" article from which I quoted last time recommends the Recuva program in this regard. Recuva has both a free version and a "professional" version for $24.95, and the former has pride of place in the aforecited "19 Free Data Recovery Software Tools" survey. Sounds good, let's do this, shall we? So, I go to this download page and download the rcsetup152.exe installer executable and then run the installer to install Recuva.

Recuva comes to us courtesy of Piriform, the same folks who make the CCleaner unnecessary file remover. Piriform maintains help documentation for Recuva here; it's not necessary to read this material to use Recuva, although doing so will give you a more complete (but not completely complete) view of the program.

Recuva run

Recuva has two modes of operation: a "wizard mode" and an "advanced mode". With respect to searching a computer for deleted files, I find that the advanced mode does not in practice do anything that can't be done with the wizard mode, although the former does provide an interface via which search results can be parsed in a value-added way, as we'll see below. When first launched, Recuva starts in the wizard mode.


We can go straight to the advanced mode by clicking the window's button, but let's stay in the wizard mode for the time being. Clicking the button takes us to a second window with a menu of files types that we may want to recover.


The menu's All Files radio button is checked by default; I'd stick with this option as its search results can be easily 'filtered' for specific file types in the advanced mode. Clicking the window's button takes us to a third window with a menu of locations where the files of interest may have been prior to their deletion.


We will target the Recovery (D:) volume in our quest to recover the .wps, .jpg, and .pdf My Documents\ data. Accordingly, we check the menu's In a specific location radio button and enter D:\ into the text input below the radio button label by either
(a) clicking the button and navigating to the Recovery (D:) location in the Browse For Folder window that pops up


and then clicking the button or just
(b) manually typing D:\ in the input.

The D:\ volume gives us a much better shot at recovering our data than does the Local Disk (C:) volume because cleaning up the computer entailed some 'write-heavy activity' - specifically, several software installs - in the latter, and there's a pretty good likelihood that some of the data has been overwritten by that activity: see the Stop using your computer! subsection of the aforecited "How To Recover Deleted Files" article.

Clicking the File location window's button takes us to a Thank you, Recuva is now ready to search for your files window in which we can elect to carry out a "deep scan".


Let's stick with a non-deep scan for now. Clicking the button starts a 3-stage scanning process.
Stage 1 of 3: Scanning drive for deleted files
Stage 2 of 3: Analyzing damage
Stage 3 of 3: Analyzing file contents
When Stage 3 has finished, Recuva displays a window with a list of files that may or may not be recoverable.


Each file name is preceded by a solid circle whose color indicates the likelihood of recovery, which is "excellent" for a ● circle, "acceptable" for a ● circle, or "unlikely" for a ● circle.

Now, a humongous list of >6000 files is not exactly a user-friendly data set; we can directorily organize the list and shed parts of it we don't want in the advanced mode, so let's switch to the advanced mode by clicking the button, which gives the window below:


Shaking the tree

By default, Recuva outputs a list view display for its search results; you can switch the display to a volume- and directory-organized tree view by clicking the button and then selecting the Tree View option in the View mode menu on the General tab of the Options window that pops up:


Clicking the button gives a display window with a single
⊞ D:\
result, whose expansion returns:


My menu is like a sieve

Between the button-menu and the button, the advanced-mode display window features a text input-menu via which the search results can be filtered by file type.


The Pictures, Music, Documents, Video, Compressed, and Emails file categories are defined for the wizard mode here; I'm pretty sure (but not 100% sure) that these definitions also apply to an advanced-mode non-deep scan.

Moreover, we can enter an *.ext1|*.ext2... expression into the input to zero in on files with specific extensions: à la the syntax of regular expressions, * matches zero or more file name characters and | serves as a boolean OR operator; for example, we can isolate the results' .wps, .jpg, and .pdf files by typing *.wps|*.jpg|*.pdf in the input.

Hmmm, ten screenshots, that's enough for one post, wouldn't you say? We'll continue our Recuva conversation in the following entry.

Monday, August 17, 2015

Profiles in PC Poisoning, Part 4

Before we get rolling, I have an addition to make to the Undamaged section of the previous post: somewhat surprisingly, CTB-Locker didn't encrypt any of the 1,850 .gif images on my father's computer - my guess is they weren't targeted because most (>95%) of them lie outside the C:\Documents and Settings\ directory.

So, what are we going to do about those .jkffbil.xyz, .bqtuzhl.xyz, and .xyz files? Is there any chance of recovering the original .wps, .jpg, and .pdf data in the My Documents\ folder?

A ctb-locker decrypt Google search brings up a number of pages that dole out advice for dealing with the aftermath of a CTB-Locker infection, and there is general agreement that restoring files from an external backup is the optimal response thereto. In the words of the Kaspersky guys themselves:
The best line of defense against this and other threats is to have backed up your machine yesterday (and to back it up again next week).
However, my father has never copied his My Documents\ data to an external medium of any type even though blank CD-Rs are cheap - you can buy a 50-disk spindle of 'em at Walmart for $10 - and copying stuff to a CD with his system is as easy as one, two, ... twelve.

Burnin' for you

A copy files to a cd windows xp Google search returns about a page's worth of pages with instructions for burning files and folders to a CD on a Windows XP machine. Because none of these pages quite describes what I do and what happens when I burn a CD on my father's computer, I thought I would give you my own little procedure in this regard.

(1) I begin by inserting a blank CD into the slot-loading CD-RW (F:) drive, which is the lower of the two optical drives held by the PC tower. (Above the F: drive is an E: drive for DVDs.)

(2) Up pops a CD Drive (F:) window that contains a menu of Windows actions for the CD.


The copy files to a cd windows xp search pages say that you should click on the Open writable CD folder using Windows Explorer option although I find that the Take no action option is also serviceable. I don't know anything about the Nero Express and Nero StartSmart programs: whatever they are, they're not necessary.

(3) Via the My Computer icon or the My Documents icon on the desktop, I navigate to the file or folder that I want to write to the CD and select it (click on it once). Holding down the Shift key allows me to select a range of consecutive items in the same directory; holding down the Ctrl key allows me to select nonconsecutive items in the same directory.

(4) I go to the Edit menu and choose the Copy To Folder... command.


(5) A Copy Items window containing a menu of places to copy the item(s) pops up.


I select the CD Drive (F:) option and then click the button at the bottom of the window.

(6) Depending on how much stuff I am copying, I may at this point see a Copying... window that displays an animation of the to-be-copied item(s) moving from folder to folder along a parabolic path.

(7) A tooltip-like speech balloon pops up in the lower-right-hand corner of the screen. The balloon points to a little CD icon in the taskbar and bears a message that reads:

You have files waiting to be written to the CD.
To see the files now, click this balloon.


(8) Clicking the balloon (vs. the icon it's pointing to) displays another CD Drive (F:) window.


Below the window's Standard Buttons toolbar
(a) a Files Ready to Be Written to the CD right pane lists the item(s) to be copied and
(b) a Write these files to CD command appears in a CD Writing Tasks menu in the left pane.

(9) Selecting the right-pane item(s) and clicking the Write these files to CD command launches the Windows CD Writing Wizard.


(10) By default, the CD name is set to the current date in a 3-letter-month-abbr DD YYYY format: you may fill in a different name if this is not to your liking.

(11) Clicking the button starts the burning process.


(12) When the burning is finished, the CD is ejected and a separate window announcing You have successfully written your files to the CD pops up.


Click the button and that's all she wrote.

One more point about screenshots

By default, Paint saves a screenshot as a (24-bit) .bmp image, which is uncompressed and therefore has a much larger memory footprint than, say, a .png image: you can and should save a screenshot as the latter via the Save as type: menu at the bottom of the Save As window.


Dark shadows

In the absence of an external backup, the ctb-locker decrypt search pages suggest two other courses of action for retrieving files encrypted by CTB-Locker:

(1) See if Windows' Volume Shadow Copy Service (VSS) has saved previous versions of the files.
Solution 3: Use the Volume Shadow Copy​
In case you didn't know, the operating system creates so-called volume shadow copies of each file if the Windows System Restore is enabled on the computer. In this way the restore points are created at specified intervals, with snapshots of the files as they appear at the moment that are generated at the same time. This method does not guarantee the recovery of the latest versions of the files but is certainly appropriate to carry out a test anyway.
- "Some ideas to restore files encrypted by CTB Locker"
The Volume Shadow Copy Service was first implemented in Windows XP but the volume snapshots it creates with Windows XP are only temporary; persistent snapshots began with the Vista version of Windows. Undeterred - and seeing a vssvc.exe executable in the C:\WINDOWS\system32\ directory - I launched the Windows Command Prompt (Start → Programs → Accessories → Command Prompt) and ran vssadmin list shadows on the command line: No shadow copies present in the system. So much for that idea.

(2) See if the original files can be recovered via a file recovery tool -
we'll get into this next time.

Monday, July 27, 2015

Profiles in PC Poisoning, Part 3

In the previous post, I detailed the removal of the CTB-Locker Trojan from my father's computer with Malwarebytes Anti-Malware. Up to this point I haven't been very specific about the damage that CTB-Locker left in its wake - I'll get into that today.

Encryption prototype

CTB-Locker encrypted hundreds of files on my father's computer. For example, CTB-Locker converted a Byron.wps file to a Byron.wps.xyz file.

The Byron.wps document was created by the word processor module of Microsoft Works, which was discontinued by Microsoft several years ago. Besides Microsoft Works, both Microsoft Word and Notepad can open a .wps file; in the latter case most of the file will be unintelligible but the original .wps content will be present therein and can be extracted if desired.

Now, what about the Byron.wps.xyz file? As it happens, there is a recognized .xyz file format, but it has nothing to do with word processing. An attempt to open Byron.wps.xyz with Microsoft Works throws the following error:
Works cannot open "C:\Documents and Settings\Owner\Desktop\Byron.wps.xyz". The file may be in use by another application, the file format may not be supported by any of the installed converters, or the file may be corrupt.
The file can be opened with Microsoft Word or Notepad but the content is complete gobbledygook in both cases. (BTW, subtracting the .xyz extension from the file name does not give a readable file, in case you were wondering.)

C: damage

In the computer's Local Disk (C:) volume, CTB-Locker mainly targeted two folders:
(1) C:\Documents and Settings\Owner\My Documents\
Most of the affected files in the My Documents\ folder were in fact doubly encrypted, as detailed below.
(2) C:\Program Files\

My Documents\

• 170 .wps documents were converted to 153 .wps.jkffbil.xyz files, 10 .wps.bqtuzhl.xyz files, and 7 .wps.xyz files. Also, a .docx document was converted to a .docx.xyz file and 4 .txt documents were converted to 2 .txt.jkffbil.xyz files and 2 .txt.bqtuzhl.xyz files.

.jkffbil? .bqtuzhl? What seems to have happened is the computer was initially hit with two different CTB-Locker infections and then after applying that video procedure to the computer a remnant of one or both infections (or maybe even a third, separate infection) later reared its ugly head and .xyz-ed (1) the .jkffbil-ed and .bqtuzhl-ed files and (2) whatever was missed the first time around - at least these are the conclusions I draw from inspecting the Created:/Modified:/Accessed: fields on the General tab of the Properties pane for a variety of encrypted and unencrypted files.

• 100 .jpg images, including all those in the My Pictures\ subfolder, were converted to 88 .jpg.jkffbil.xyz files, 7 .jpg.bqtuzhl.xyz files, and 5 .jpg.xyz files.

• 25 .pdf files were converted to .pdf.jkffbil.xyz files.

• 4 .zip packages were converted to 2 .zip.jkffbil.xyz files and 2 .zip.bqtuzhl.xyz files.

• In the My Music\ subfolder, 2 .itl iTunes libraries were converted to .itl.xyz files and 2 .itdb iTunes databases were converted to .itdb.xyz files.

• In the My Videos\ subfolder, a .flv video was converted to a .flv.xyz file.

• Lastly and least, there are 338 .png.xyz files and 4 .css.xyz files in RegCure Pro\ and SpeedyPC\ subfolders that really shouldn't be on my father's computer in the first place.

Program Files\

• 384 files were converted to 272 .jkffbil files and 112 .bqtuzhl files; all of these files are singly encrypted. Affected file formats: .cer, .doc, .eps, .jpg, .js, .mdf, .pdf, .ppt, .rtf, .txt, .xls, and .zip.

Etc.

• There are 9 encrypted files in the C:\Documents and Settings\Owner\Desktop\ folder and 20 encrypted files in the hidden C:\Documents and Settings\Owner\Application Data\ and C:\Documents and Settings\Owner\Templates\ folders. Affected file formats: .air, .dbf, .doc, .docx, .jpg, .js, .pdf, .ppt, .rtf, .txt, .wb2, .wps, .xls, .xlsx, and .zip.

• Outside of the C:\Documents and Settings\Owner\ folder, 2 .wma audio clips were converted to .wma.xyz files and 4 .jpg images were converted to 2 .jpg.jkffbil.xyz files and 2 .jpg.bqtuzhl.xyz files in the C:\Documents and Settings\All Users\Shared Documents\ folder.

D: damage

Twice in the past - about five months ago and in 2012 - the Address Book\, Desktop\, Favorites\, and My Documents\ subfolders of the C:\Documents and Settings\Owner\ folder were copied to the computer's Recovery (D:) volume. Without exception, all of the encrypted C:\Documents and Settings\Owner\Desktop\ and C:\Documents and Settings\Owner\My Documents\ files were also encrypted in the D: volume although not necessarily in the same way, e.g., some of the .jkffbil.xyz files appear as .bqtuzhl.xyz files and vice versa.

Undamaged

• The following file types were left alone: .bak backups, .bmp images, .dat data files, .db databases, .dll libraries, .exe executables, .htm and .html and .xml Web documents, .mp3 audio files, .wav audio files, and .xlr Microsoft Works spreadsheets (not a complete list).

• Gratifyingly, the C:\WINDOWS\ folder was left untouched.

In search of a key

I found a "How to remove CTB Locker Virus" article whose Stage 3 : Unlocking files that were encrypted by CTB Locker section suggests that a Panda Ransomware Decrypt program might be able to decrypt CTB-Locker-encrypted files and provides a link thereto. My attempts to decrypt a small group of encrypted files with Panda Ransomware Decrypt are not worth discussing to any extent: suffice it to say that they didn't work.

To my understanding, file decryption tools are target-specific, i.e., a program that unlocks files encrypted by a specific type of ransomware will generally be useless for files encrypted by other types of ransomware. As of this writing and as far as I am aware, no one has written a program that can decrypt files encrypted by CTB-Locker.

Subsequently, I decided to see if I could re-obtain the affected data on my father's computer via a file recovery approach, which did prove somewhat successful, and I'll tell you about it in the following entry.

Saturday, July 11, 2015

Profiles in PC Poisoning, Part 2

Let's get back now to our ongoing discussion of my father's computer and its CTB-Locker ransomware infection. As noted in the previous post, the protocol provided by this "REMOVE CTB-Locker" YouTube video didn't pan out very well. What next?

Go to the root

It occurs to me that I may be able to return the computer to a pre-infection state via Windows' System Restore feature. I go to the System Configuration Utility and click the button on the General tab (see the first screenshot in the next section). An alert( ) message pops up:
System Restore has been turned off by group policy. To turn on System Restore, contact your domain Administrator.
When it rains, it pours, huh? I go to my iMac to research the message, and come across a helpful Microsoft Community page on which "A. User" states:
Unless you disabled [System Restore] on purpose, the chances are good that your system has a malicious software infection. ... You need to fix the immediate problem of [System Restore] not working [vis-à-vis running System Restore itself], then scan your system for malicious software when you are done.
A. User goes on to recommend Malwarebytes and SUPERAntiSpyware programs for the removal of malicious software.

We'll get back to System Restore later in the post, but for now let's see where this gets us, shall we?

Under the knife

I download installers for CCleaner (go here to download the ccsetup*.exe executable on a Macintosh) and Malwarebytes Anti-Malware and write them to a CD on my computer. My attempts to copy the installers to my father's computer either generate a fusillade of errors or cause the system to hang, depending on the computer's boot state.

On my father's computer and in Selective Startup mode per the settings shown below - the
Load Startup Items
checkbox is unchecked because all of those items have been disabled via the Startup tab -


a second attempt to download the CCleaner installer is successful (I'm pretty sure that first download attempt was in Normal Startup mode, but I can't remember); installing and running CCleaner subsequently proceed without incident.

An attempt to download the Malwarebytes Anti-Malware installer from Malwarebytes itself in Selective Startup mode throws a "Secure Connection Failed" error; fortunately, I am able to download the installer from c|net. I am unable to install Malwarebytes Anti-Malware in Selective Startup mode; a malwarebytes anti-malware won't install Google search leads me to a "Cleanup Malware Using Malwarebytes" .pdf whose What To Do If Malwarebytes Won’t Install Or Won’t Run section instructs the user to install Malwarebytes Anti-Malware in SAFE MODE (not SAFE MODE WITH NETWORKING), i.e.:


I boot the computer into its /SAFEBOOT-MINIMAL mode. Installation of Malwarebytes Anti-Malware is successful and I scan the computer with it: 6 threats are detected, and I remove them. I boot the computer into its /SAFEBOOT-NETWORK* mode and then update the program's database(s) and run a custom scan per the Running Malwarebytes section of the .pdf: this time 62 threats are found and I get rid of them too. Gratifyingly, the latter scan serves to return the computer to operational normalcy, the encrypted files notwithstanding.

*The What To Do If Malwarebytes Won’t Install Or Won’t Run section says that after the /SAFEBOOT-MINIMAL scan you can go directly to Normal Startup mode and should then do a second, custom scan; I strongly recommend that the second scan be carried out in /SAFEBOOT-NETWORK mode in order to keep any remnants of your infection(s) at bay while you are cleaning up your computer. Upon subsequently returning your computer to Normal Startup mode or a Selective Startup variant thereof, however, you should indeed scan it again to make sure everything's OK. If I recall correctly, a third, Selective Startup scan of my father's computer did detect one last threat.

A word on screenshots

The screenshots in this post were taken via the procedure outlined on this page, with one important detour: on my father's computer I launched the Paint program by opening mspaint.exe with the Run command as the computer's Start → Programs → Accessories menu does not have a Paint selection.

System Restore, revisited

Once the computer is clean, I re-enable System Restore via the Registry Editor-based "Method 2" detailed on this page ("Method 1" is not applicable because, contra a note near the bottom of the page, the Home Edition of Windows XP does not have a Group Policy Editor).

I go to Start → Programs → Accessories → System Tools → System Restore and am hit with a confirm( ) box whose message reads, System Restore has been turned off. Do you want to turn on System Restore now? I click the box's button and am taken to the System Restore tab of the System Properties tool:


I uncheck the
Turn off System Restore on all drives
checkbox: this enables the button, which I click, and then I click . I return to System Restore and am greeted by a "Welcome to System Restore" window; I click the button at the bottom of the window in order to
Restore my computer to an earlier time.
System Restore then displays a "Select a Restore Point" window showing a single restore point that is a year into the future and a related July 2016 calendar that cannot be moved forward or backward.


As it happens, turning System Restore off deletes its restore points, so System Restore wouldn't have been able to help me in the first place. Was this disabling action part of the CTB-Locker 'payload'? I don't know.

Now, what about those encrypted files? We'll take stock of what we've got in the following entry.

Friday, July 3, 2015

Profiles in PC Poisoning, Part 1

About a month and a half ago, my father walked into my room and asked me to take a look at his computer: "I can't do anything with it." Sure enough, something was slowing his computer down to the point that it took several minutes to process a mouse click - if it responded at all (i.e., if the system didn't hang). With some major-league perseverance I have been able to largely nurse his computer back to health: believe me when I tell you that this is the most exasperating thing I have had to deal with in my entire life.

My father's computer has a 1.39-GHz processor and 736 MB of RAM, which is not so different than the 2.4-GHz processor and 1 GB of RAM that my own computer has. But that's where the similarities end. I have an Intel iMac that runs OS X 10.6.8 whereas he has a Compaq 5017m that runs Windows XP Home Edition Service Pack 3. At this point you are thinking, "Windows XP? Dude, just get a new computer already." Yeah, yeah, we'll get to that: I am acutely aware that Microsoft pulled the plug on its XP support a little over a year ago. Be that as it may, a Compaq running XP is what I had to work with; moreover, there was an 'archival' aspect to its cleanup that appealed to me.

Low-hanging fruit

So, I trudge over to Google, run a windows xp troubleshooting slow search, and decide to try some of the things recommended by a "How to Speed Up a Windows XP Computer" wikiHow article.

I go to the computer's Add or Remove Programs Control Panel and throw out all of the Apple stuff - iTunes, QuickTime, a Bonjour program I am unfamiliar with, a Software Update application - and then get rid of RealPlayer. I reason, "If he wants to listen to music or watch a movie, he can do that with the Windows Media Player that is built into XP." I access the Add or Remove Programs panel via the My Computer pointer in the upper-left-hand corner of the desktop - this is a lot easier than getting to it via the Start menu.

I use the Disk Cleanup utility to
(a) delete temporary files,
(b) empty the Recycle Bin, and
(c) compress what can be compressed
for the C: volume. The Disk Cleanup utility can be launched by opening cleanmgr.exe with the Run command, which I access via a &Run... pointer on the desktop.

I defragment the C: and D: volumes via the Disk Defragmenter utility, which can be launched by opening dfrg.msc with the Run command.

I disable all of the system's Startup Items via the Startup pane of the System Configuration Utility, which can be launched by opening msconfig with the Run command.

None of this has any noticeable effect on the computer's performance.

Hitting the iceberg

The wikiHow article recommends
(1) a CCleaner program for the removal of unnecessary files and
(2-4) Spyware Blaster, AVG, and Avira programs for the removal of spyware and/or viruses.
An initial attempt to download CCleaner causes the browser (Firefox) to crash. AVG 2015 is installed already on the computer: a "Scan now" operation turns up nothing.

I wonder, "If worse comes to worse, can I copy programs onto the hard disk via a CD?" In the course of trying to mount one of my old CDs via the F: drive I am suddenly confronted with a screen very similar to the one shown in the image below:


Uh-oh. My father's computer is infected with a ransomware program - specifically, a trojan named CTB-Locker - that has encrypted various files on the computer and will leave them encrypted unless a ransom payment is tendered within 96 hours. Clicking the button does display a list of encrypted files, most of which are in the computer's My Documents folder(s). I do not proceed to the 'payment page': whatever the payment is, I'm not going to pay it.

What doesn't work (for me at least)

I go to my iMac to research CTB-Locker on the Web, and come across a "How do I REMOVE CTB-Locker ransomware (Free removal guide!)" YouTube video. The video gives the following procedure for getting rid of CTB-Locker:
(1) Reboot the computer into its safe mode.
(2) Go to the Temp folder, show its hidden files, and then delete everything in it.
(3) Go to the My Documents folder and delete the "Decrypt All Files" .bmp image that should be residing there.

• I put my father's computer into its safe mode by launching the System Configuration Utility, checking the
/SAFEBOOT
checkbox in the Boot Option menu on the BOOT.INI tab, clicking , clicking , and restarting the computer.

• In this case, the Temp folder refers to the C:\Documents and Settings\Owner\Local Settings\Temp\ folder (vis-à-vis the C:\WINDOWS\Temp\ folder), which can be opened by opening %temp% with the Run command.

I clear out the Temp folder. There are two "Decrypt All Files" .bmp images in the My Documents folder and I delete both of them. I go back to the System Configuration Utility, check the
Normal Startup - load all device drivers and services
radio button in the Startup Selection menu on the General tab, and restart the computer. After the boot the ransom screen is gone but the computer still runs excruciatingly slowly. Without getting into the details another ransom screen emerges with a vengeance a few hours later - if I recall correctly, this is triggered by an attempt to surf the Web.

It would seem that the video procedure cures symptoms of the CTB-Locker infection and not the infection itself, but I don't know for sure; in any case, stronger medicine is clearly required. So, what do I use to clean up my father's computer, and how exactly do I do it? All will be revealed in our next episode.